Dashboard Guide
Dashboard Version 1.23
Latest Changes
Updated admin roles and simplified implementation structure.
Last Updated
August 5th 2025
Table of Contents
Step 1 – Log In
The Account Owner is the person responsible for setting up the Dashboard and should have received an email from alerts@silentbeacon.com which contains the temporary login credentials.
Note: We recommend bookmarking dashboard.silentbeacon.com to your web browser.
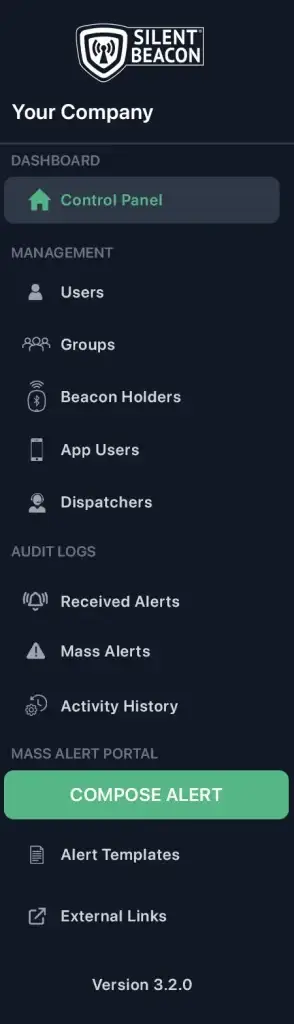
Step 2 – Review Navigation Bar
The navigation bar, which displays your company’s name, is divided into the following sections for ease of use.
- Dashboard
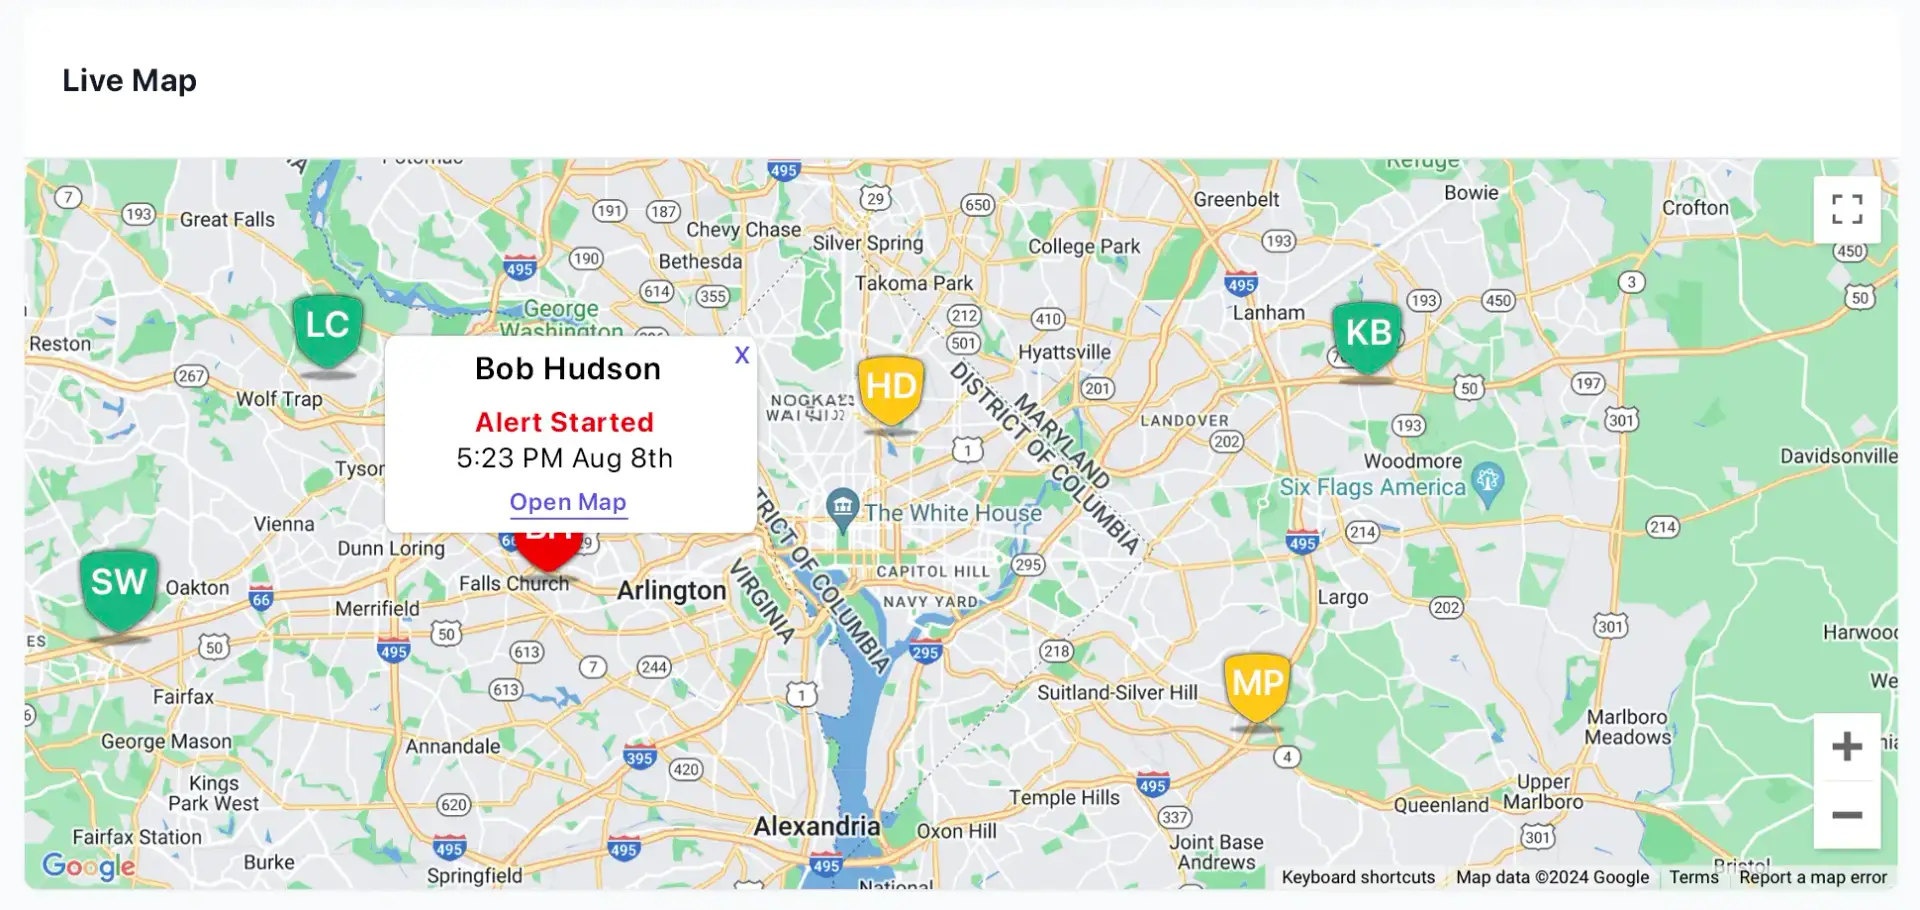
- Control Panel: View current alerts in real-time and access individual alerts on their map.
- Management
- Users: Add new users and adjust their roles (formerly “People”).
- Groups: Create custom groupings of users to receive alert notifications.
- Beacon Holders: Manage and monitor the Silent Beacon panic button users, their dispatchers, and alert groups.
- Dispatchers: Manage how the users receive notifications from your internal dispatchers notify.
- Audit Logs
- Received Alerts: View the log of user alerts.
- Mass Alerts: View the log of all mass alerts sent from the portal.
- Activity History: View the log of any admin deletions or changes within user management.
- Mass Alert Portal
- Compose Alert: Create, add the proper groups, and send mass alert notifications.
- Alert Templates: Create email, text, and voice recordings for mass alerts.
- External Links: Access legal documents and how-to guides.
- Version: Current version of the Dashboard.
Please review the following notes to help minimize user errors.
Dashboard: Only the Super Administrator, Administrators, and Dispatchers have access to the Dashboard. To view a complete list of users and their permissions, please refer to the “Step 4 – Add People” section.
Application: The Silent Beacon for Businesses App must remain open or running in the background of your phone at all times! While the Beacon can still call the Dispatcher if the App is closed, your contacts will not receive the designated notifications.
Privacy: The user’s location is only shared when you activate an alert mode and stops sharing once the user has deactivated the alert. Silent Beacon does not collect or share your location if an alert mode is not activated.
Step 3 – Add Groups
Go to the “Groups” section in the Dashboard. Click on ‘+ Add New Group’ in the top right corner. It’s important to complete this step before adding users because you’ll assign groups to three main parts of the Dashboard: Beacon Holders, Dispatchers, and the Mass Alert Portal (if purchased).
Beacon Holders Page
Add to each individual Beacon Holder where it says Alert Groups.
Dispatchers Page
Add to each individual Dispatcher where it says Alert Groups..
Mass Alert Portal
Chose any number of groups to send our a mass alert.
Many companies form groups by team, department, or office location. It’s a good idea to create a group named ‘All Users’ for company-wide alerts. Additionally, many companies make a group called ‘Managers’ to ensure that management receives notifications during emergencies. You can create more groups anytime.
Alert Groups Tab
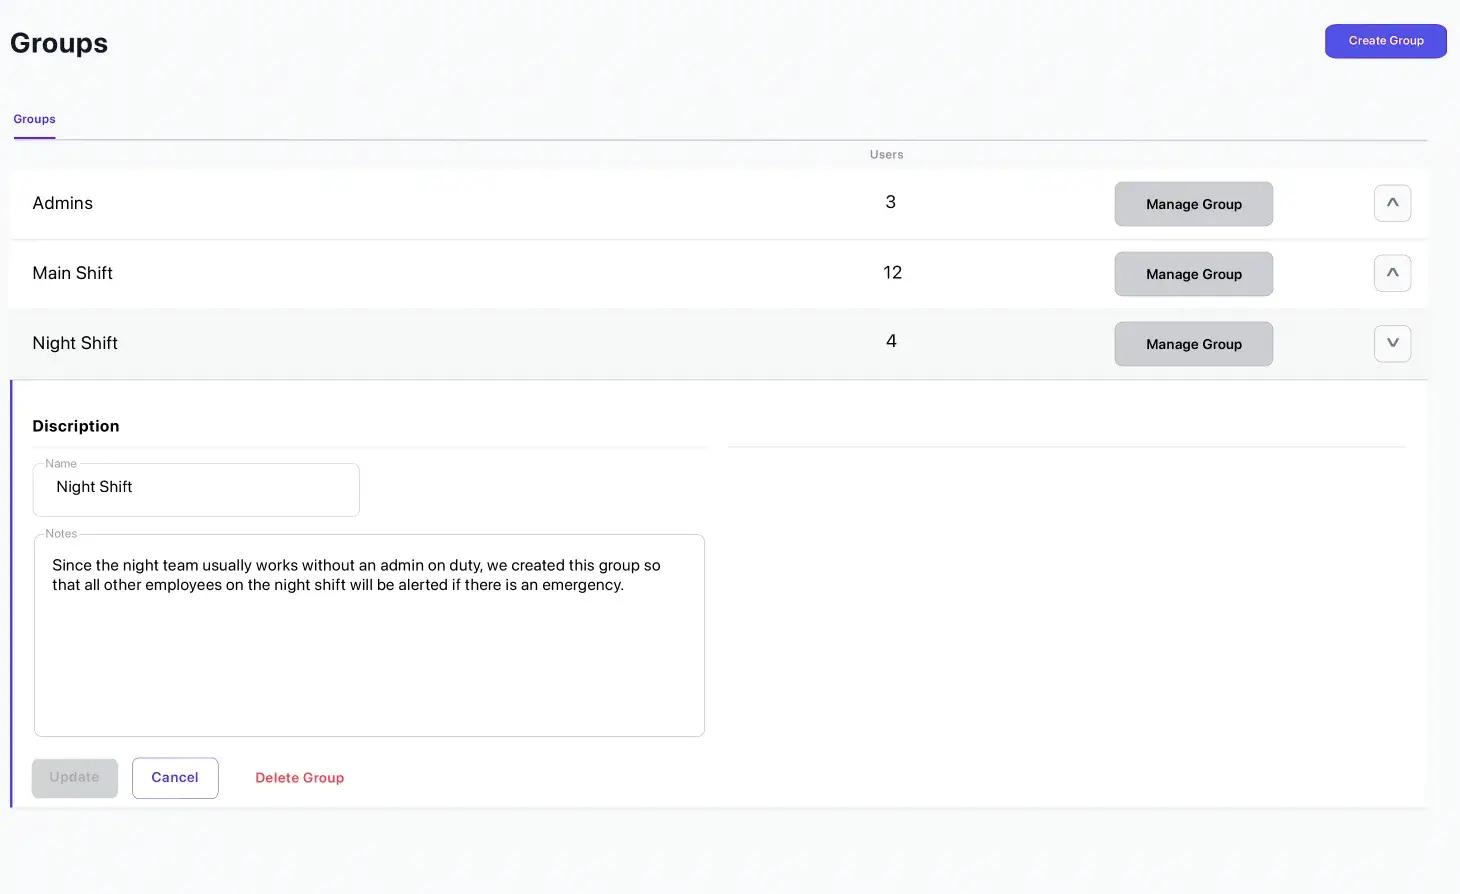
Note:
Please create a ‘Test Group’ for anyone on your implementation team. This group should include all individuals responsible for implementing ESS across your organization, such as Administrators, Dispatchers, Beacon Holders, and Recipients.
Adding new Users to the Dashboard
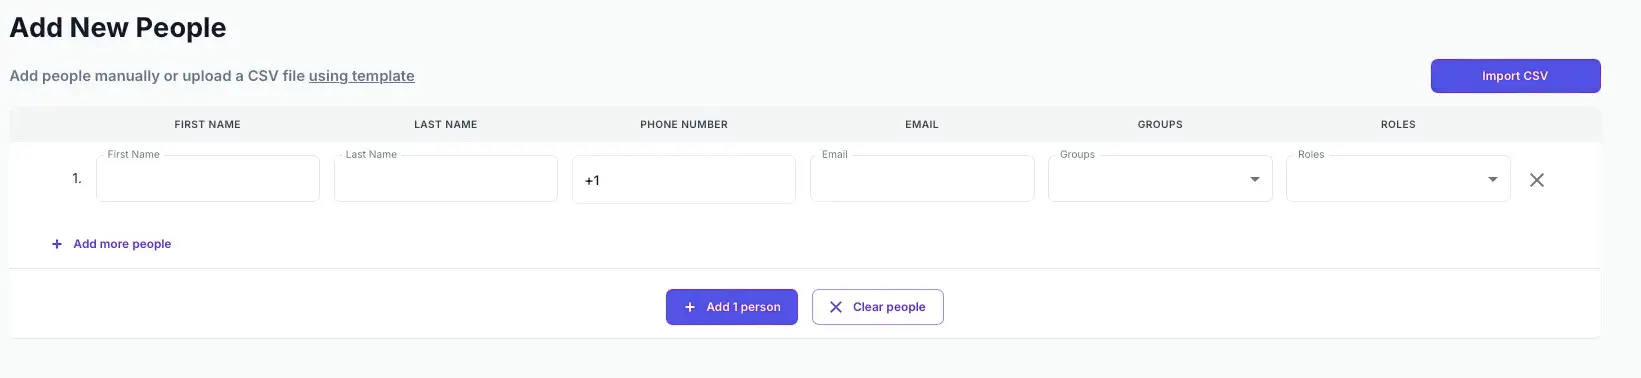
Note:
You can add users by manually entering each one or by importing a CSV file to bulk upload. Click ‘using template‘ to access the CSV template, and ensure each user’s phone number is accurate before importing the file.
Step 4 – Add Users/Roles
Navigate to the ‘Users’ section in the Dashboard and click ‘+ Add New Users’ in the upper right corner.
Select the group or groups the user belongs to. Users can be assigned to a single group or multiple groups, typically organized by department, shift, location, or similar structure. Note: this is not the same as an alert group.
For the role of Beacon Holders and internal company Dispatchers, please ensure you use the phone number that is attached to their App.
Users Tab
Below are the definitions for each role to help you select the most appropriate one.
- Account Owner: Responsible for setting up the Dashboard, training users, overseeing system implementation, and acting as the main contact between the company and Silent Beacon.
- Administrator: Responsible for adding/updating users, roles, groups, settings, and can generate reports within the Dashboard.
- Dispatcher (Internal): Responsible for managing emergency alerts within the system, allowing them to monitor and respond to alerts in real-time. Each user can have one active dispatcher and may include designated company personnel, 911, or our 24/7 professional monitoring service. All Internal Dispatchers will need a Silent Beacon Panic Button.
- Dispatcher (External): An External Dispatcher such as 911, will only be able to receive notifications via phone call and GPS triangulation, and will not have access to the Dashboard or mass alert portal.
- Beacon Holder: Users who are assigned a Silent Beacon panic button that pairs with the Silent Beacon Business App. With one press of a button, Beacon Holders can send their GPS location across multiple notification channels while simultaneously calling their assigned dispatcher. Other Beacon Holders can be notified of the emergency directly through their Beacon. Beacon Holders can send and receive alerts.
- Recipient: Users who can only receive alerts and not send, from Beacon Holders, App users, and/or mass alerts issued by a dispatcher.
- Personal Contact: A premium add-on feature that allows users to directly import an external contact into the App to receive their alerts. The personal contact is only stored within the user’s App.
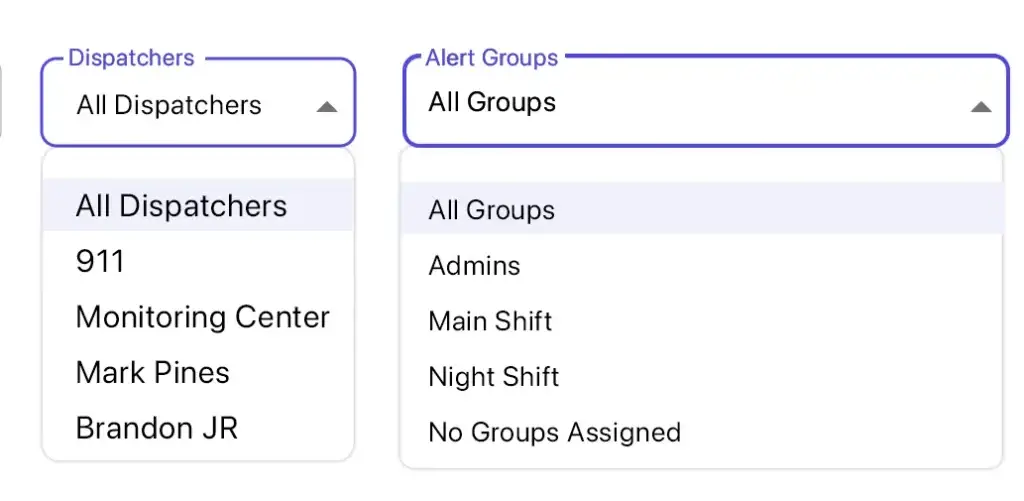
Step 5 – Assign Beacon Holders
Navigate to the ‘Beacon Holders’ tab.
This is where you will be adding the emergency number that will be called by each Beacon Holder as well as any Alert Groups.
Start by selecting the Dispatcher drop-down, and choose either 911, an internal dispatcher you have added, or our 24/7 Professional Monitoring Service (add-on service).
IMPORTANT! For testing purposes, please designate an internal dispatcher instead of 911.
Once a Dispatcher is chosen click the Alert Group drop-down and select the Alert Groups this Beacon Holder is to notify when an alert mode is activated.
Dispatchers and Alert Groups
Beacon Holders Tab
The additional information on this tab includes the Beacon Holder’s battery level, serial (MAC) number, and status which indicates whether they are connected to the App. During work hours, Beacon Holders should always remain connected to the App and display a green status.
IMPORTANT! Each Beacon Holder must have a Dispatcher selected. If a Dispatcher is not chosen, the Beacon Holder will not be able to place a call in an emergency.
Step 6 – Set Up Beacon Holders
Have your Beacon Holders download the App and follow the App Guide to set up and connect their App to their panic button for business. You can also provide them with the online Beacon manual, available here: 2.0 Online Panic Button Manual.
Links to the Silent Beacon Business App


IMPORTANT! As stated above, at least one Beacon Holder and Dispatcher should be added before the onboarding meeting. Otherwise, Silent Beacon will not be able to cover all the functionality of the Dashboard.
Step 7 – Beacon Testing
It is strongly recommended that you set up a few Beacon Holders and Dispatchers to test the system before going live with Enterprise Safety Solutions.
Instruct the Beacon Holders within your “Test Group” to test the various alert modes. Please refer to the 2.0 Online Manual for step-by-step instructions on how to activate each alert mode.
- Emergency Mode: Initiates a call to the Dispatcher, and sends text and email notifications to the Alert Groups with the Beacon Holder’s custom alert message and GPS location.
- Footsteps Mode: Enables real-time tracking of the Beacon Holder’s location to be shared with designated Alert Groups
- Check-in Mode: Sends a non-emergency message with a snapshot of the Beacon Holder’s current location to designated Alert Groups.
IMPORTANT! Please ensure 911 is not selected as the Dispatcher during testing.
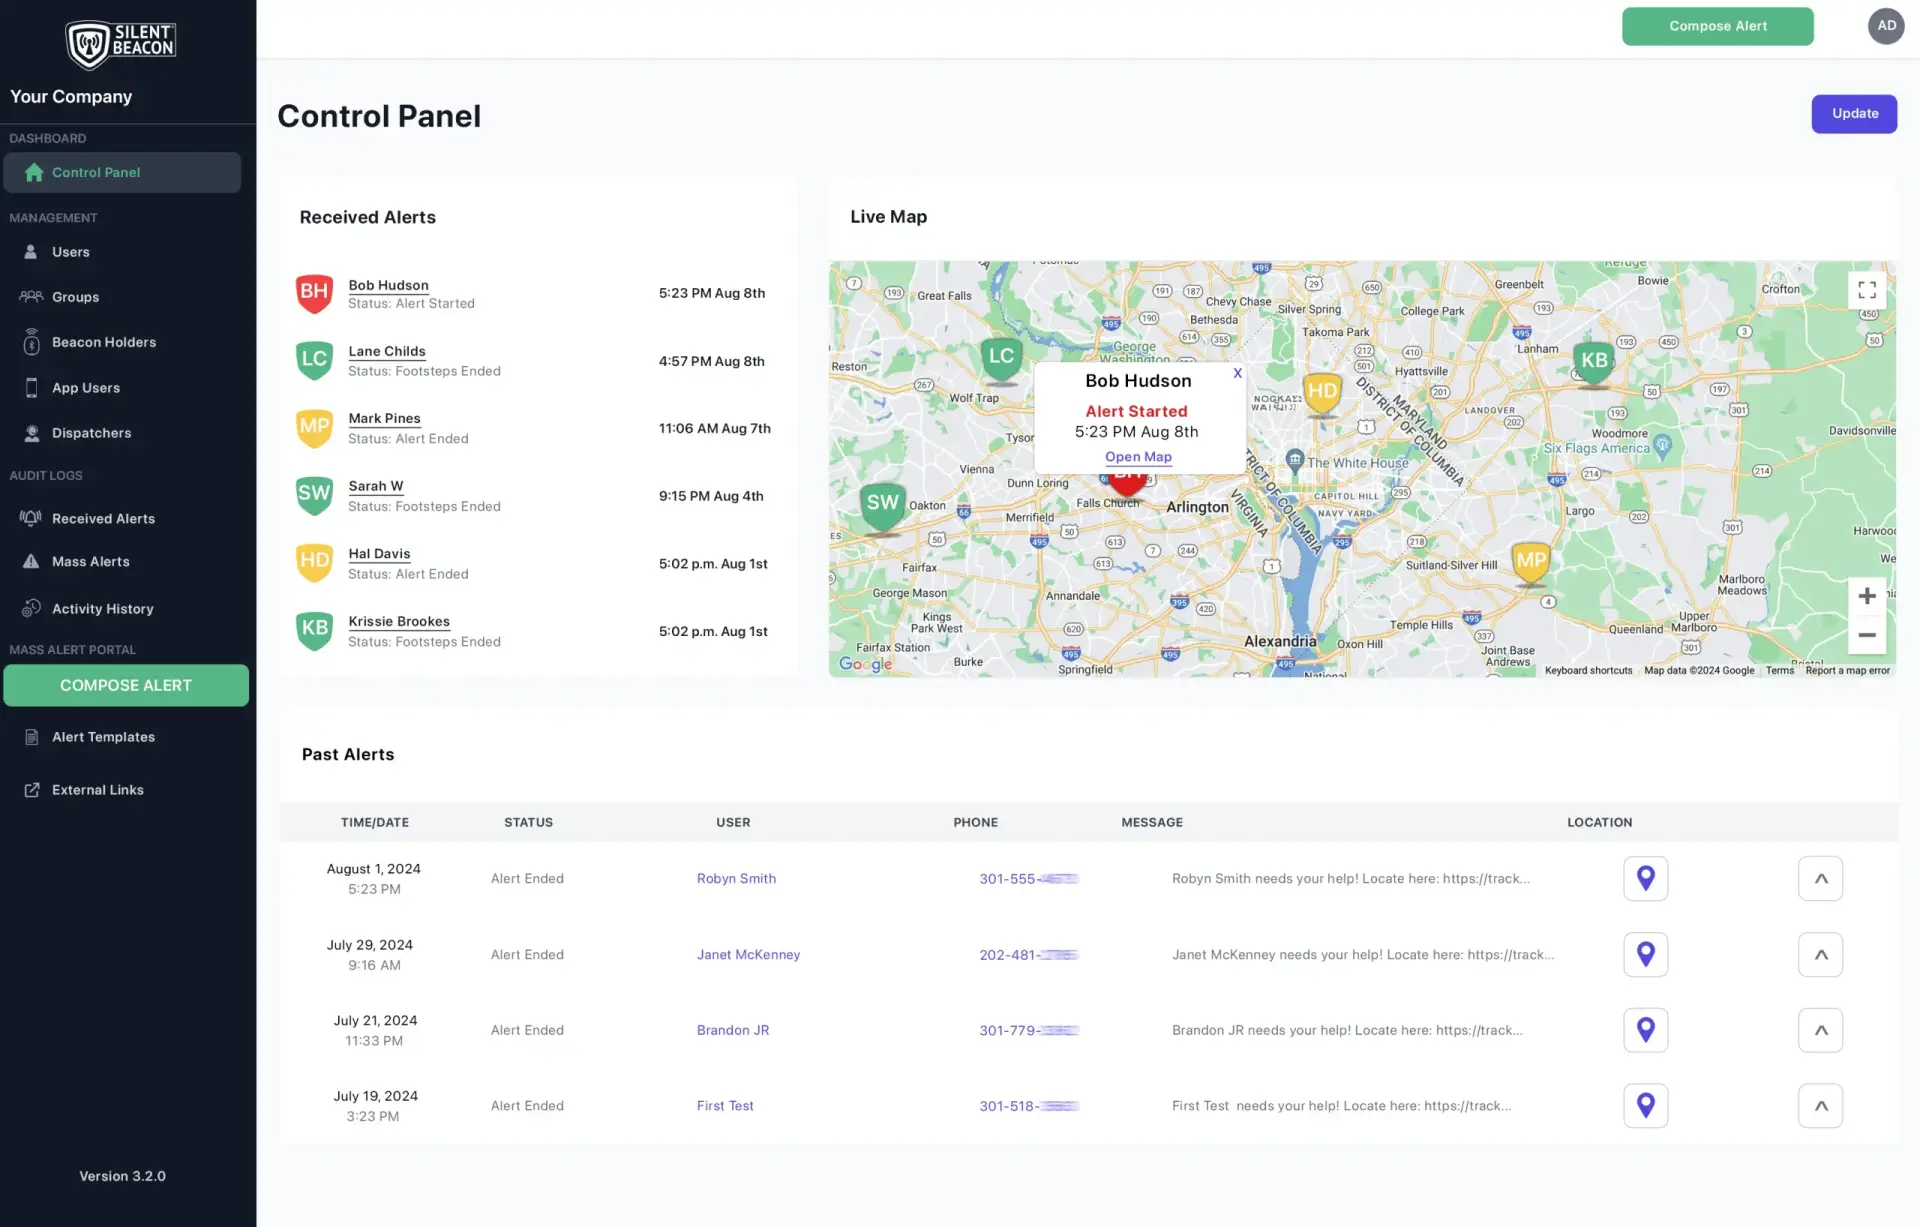
Control Panel View
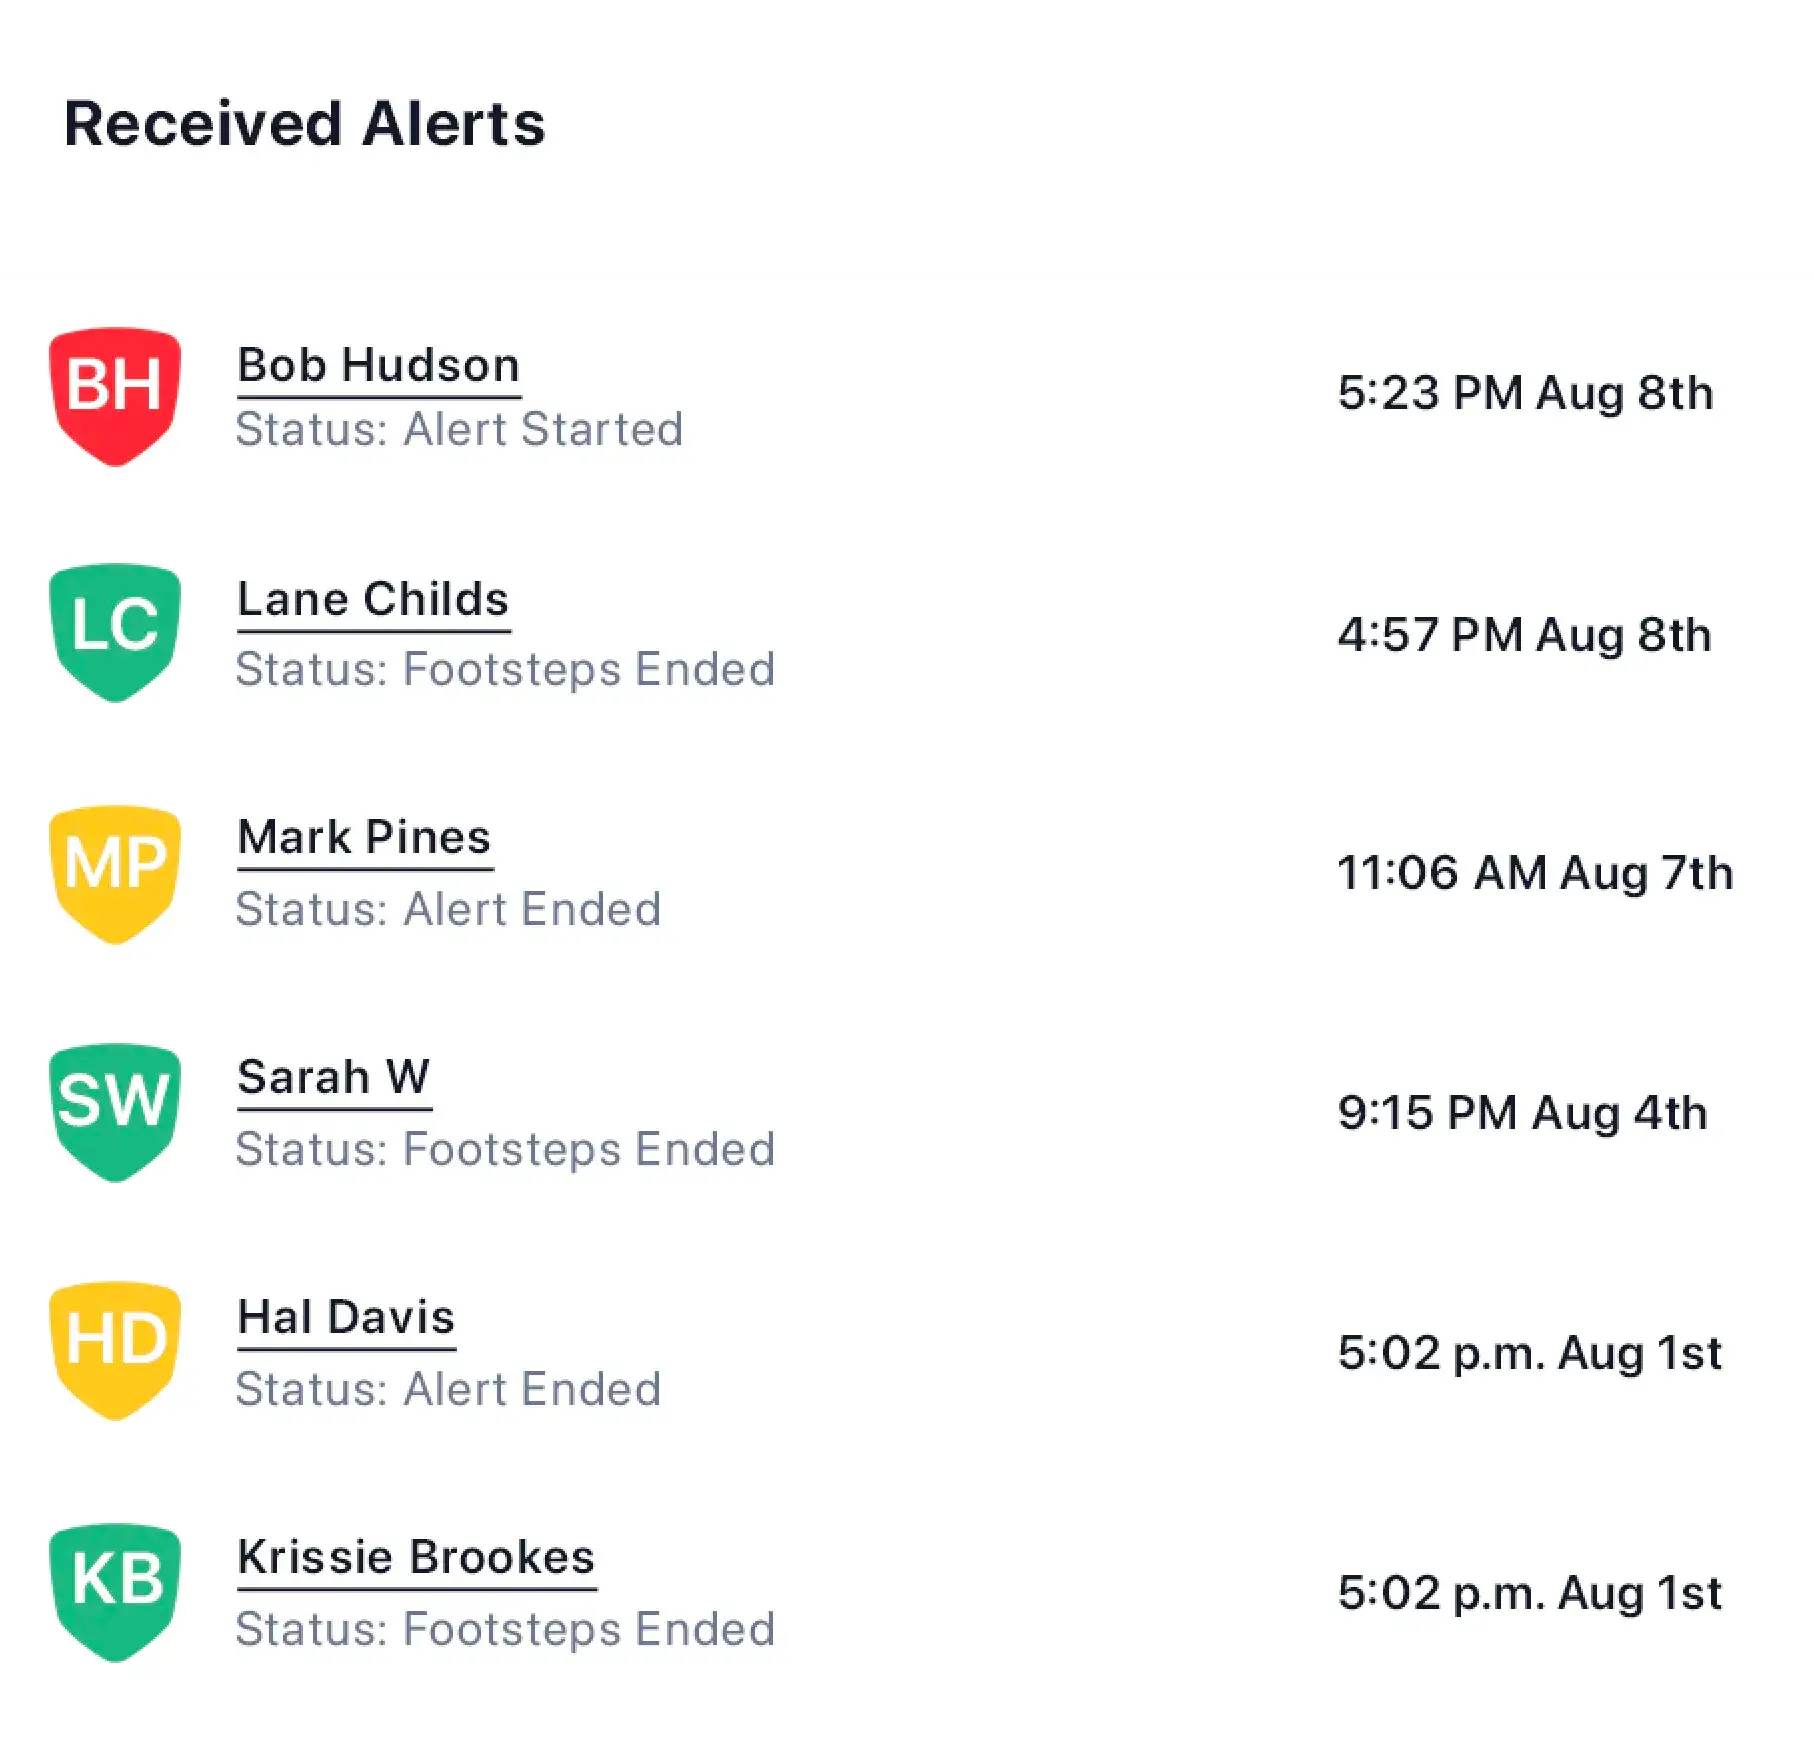
Step 8 – Dispatcher Review
Have your company Dispatcher (or assign yourself as one) view and respond to the active alerts within the Control Panel.
Clicking an Alert Icon opens the individual map of the corresponding Beacon Holder, providing more details. To enter full-screen mode, click the box icon in the top right corner.
Familiarize yourself with the color key below, which represents each alert mode and user status.
Indicates that the user is currently in an emergency situation.
Indicates that the user has recently experienced an emergency.
Indicates that the user has activated the Footsteps alert mode.
Indicates that the user has the App open and is connected.
Indicates that the user is not connected to the beacon or application.
This is a recipient who can only receive alerts (not send them).
Step 9 – Review Map and Tracking
While still logged in as a Dispatcher, you can access the individual’s Tracking Map through the Live Map section. Clicking an Alert Icon opens the specific map for the corresponding Beacon Holder or App User, providing the following details:
View Past Movement: Displays a trail of the user’s movements, including starting and current endpoints.
Get Directions: Opens Google Maps to locate the user in distress.
Approximate Address: Utilizes Mapping to find the user’s current location.
Toggle Map View: Switches between a 3D satellite view and a standard map view.
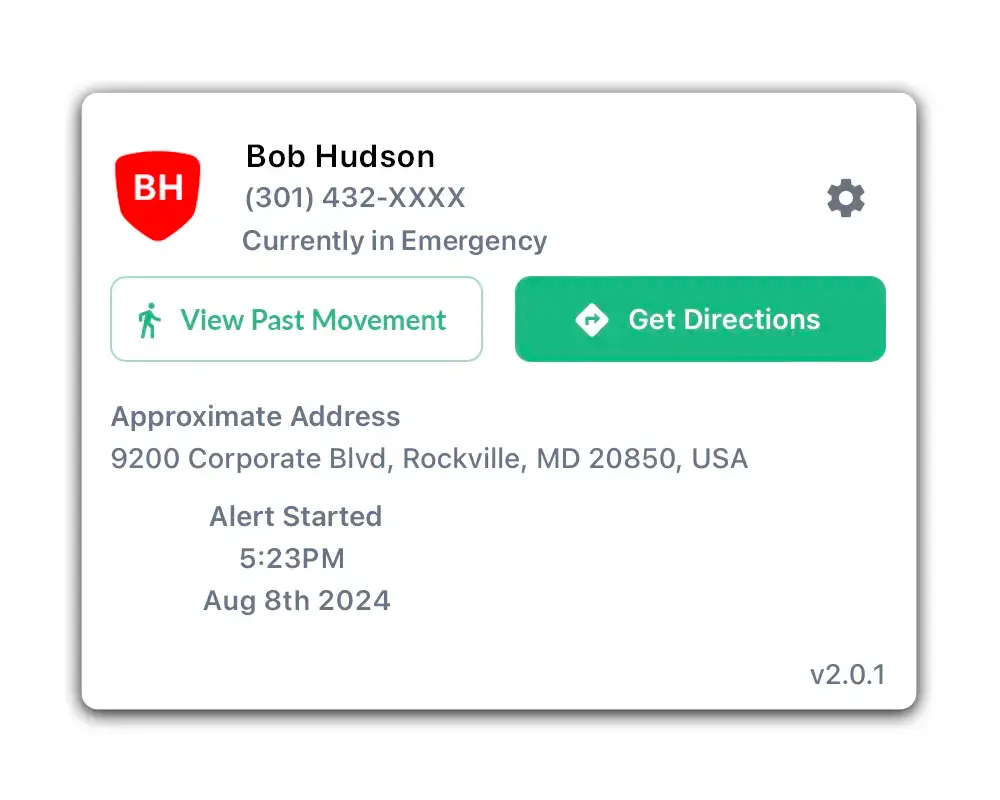
Live Map
Individual Tracking Map
Additional information includes:
- Time the alert started and ended
- Directions to the Beacon Holder’s location
- Beacon Holder’s name and contact number
Step 10 – Kickoff Meeting with Silent Beacon
In the Kickoff Meeting, Silent Beacon will assist the Account Owner with account setup, navigating the Dashboard, adding implementation team members, and defining their roles.
Step 11 – Beacon Holder Meeting (Premium)
Once the Kickoff Meeting with Silent Beacon is completed and you are ready to roll out ESS across your organization, you have the option to schedule a subsequent meeting with Silent Beacon to guide all Beacon Holders through pairing their panic buttons.
Setup Complete!
This concludes our Dashboard Setup Guide. If you have any additional questions, please check out our other guides. For further assistance, you may also contact your dedicated Customer Experience Representative or Sales Representative.
Here is some additional information that could be useful as you navigate the dashboard. We hope these details help you make the most of the features and tools available.
Dispatch
Active Dispatcher
The Active Dispatcher is a key role within your company responsible for receiving emergency notifications via Beacon, phone, and email. Depending on your company’s policy, the Dispatcher can access the GPS location of Beacon Holders and initiate appropriate assistance, which could involve contacting emergency services such as 911 or following other established procedures.
To manage the Active Dispatcher, the Administrator can toggle between individuals listed as Inactive Dispatchers below this section. Additionally, any Beacon Holder can be assigned the role of Dispatcher by selecting the corresponding box in their profile.
Emergency Alert Call Settings
The following emergency calling contacts are options for the Administrator to select for handling phone calls received by Beacon Holders during emergencies:
- 911: Initiates a call to 911 from the Beacon Holder; the Active Dispatcher still receives notifications but not a phone call.
- Active Company Dispatcher: Places a phone call from the Beacon Holder to the Active Dispatcher, located on the left side of this page.
- Silent Beacon 24/7 Monitoring Center: This option provides access to our Professional Monitoring Service, ideal for companies lacking internal resources for monitoring employee emergencies.
Management
This section houses all users on the portal, including Administrators, Beacon Holders, and alert Recipients. To modify or add roles, simply toggle the corresponding role within the user’s page.
Groups
Under the “Manage Groups” menu, there are two tabs: “Groups” and “Combo Groups.” By creating Groups, the Administrator can alert specific people at the click of a button. To create a group, select the “Group” tab and click “Create New Group”. Input a group name and click “Create”. After creation, you can add notes or delete the group by selecting the dropdown arrow. You can manage Recipients or profiles by clicking the “Manage Recipients” button and selecting members by keyword, role, or criteria. To add profiles directly to a group, click the “Add New Profile” button within the group.
Combo groups link multiple groups together for streamlined alerting. To create a combo group, select the “Combo Group” tab, and click “Create New Combo Group”. Input a name and click “Create”. The Administrator can manage which groups are part of the combo group by clicking the dropdown arrow and editing the name and notes. To save changes, click “Update”.
Beacons
Under the “Beacons” menu, the Administrator can export a CSV file containing information on each registered beacon. The Administrator can toggle between active and inactive beacons and search for specific beacons using the search bar. Clicking on a beacon enables the Administrator to toggle its status and view its current location.
Alert Templates
The “Alert Templates” menu allows you to create, prepare, and store preset alert messages. The Administrator can edit template names and information, but not message types, by selecting the dropdown menu to the right of each item. To create a new template, click “Create New Template”, input a name, select the message type, and compose your message. Once selecting either text, email, or audio, a new box will appear to type in the message or record the audio. Click “Create” to save the template.
Messages
The Messages menu is divided into “Notifications” and “Alerts”. Both sections feature an export button to download a CSV file of alerts and notifications.
Alerts
In the “Alerts” section, the Administrator can review all the historic mass alert messages. Each alert includes details such as the time and date sent, the Active Dispatcher, the Recipient groups, the alert type/method used, the message or template utilized, and the number of Recipients who received the alert. By selecting the drop-down menu next to each alert, the Administrator can view a larger display including the groups involved and the full message if it exceeds character limits.
Notifications
Under the “Notifications” tab, you’ll find alerts from Beacon Holders to Dispatchers. These notifications provide information such as the beacon that sent the alert, the user it is assigned to, the time and date of the alert, available location details, the emergency status, and the receiving active dispatcher.
Compose Alert
Selecting the “Compose” button in the top header or side navigation bar will bring you to the “Alert Center” menu.
To send a mass alert you begin by selecting the group you would like to alert by selecting each group or combo groups such as entire buildings or floors depending on the structure you set up. Once you have selected your groups, click “Continue” to proceed to messages.
In the Messages section, you’ll find three categories: texts, emails, and audio. Here, you can choose the type of message you want to send. Once you’ve selected a message type, you can either use a pre-made template for quicker response time or type a message in the provided box. Click “Continue” to preview the alert message before sending it to the corresponding Recipients and if the alert message is acceptable, click “Send Alert”. If you need to make any changes, simply select “Back”.